CMake, Visual Studio, and the Command Line
For quite some time now I’ve been working inside teams who were using Visual Studio to build complex C++ projects.
Because I’ve often been the “buildfarm guy” and because I don’t like GUIs that much, I had to find ways to build Visual Studio projects from the command line.
This is the story of everything I’ve tried.
Quick note before we begin: throughout this article, I will be using Visual Studio 2015 on Windows 10 to build the source code of CMake itself. If’s a nice project for a case study, since it’s neither too big nor too small, and has no dependencies to worry about (and of course, it uses CMake to build itself :)
Using CMake to generate Visual Studio projects #
CMake works by parsing code in CMakeLists.txt files, and then generating
code that will be used by an other program that would perform the build
itself.
When you use CMake, you must specify a generator.
On Windows, the default generator will be the most recent Visual Studio found,
and after running CMake, you’ll get a .sln file you can open in Visual
Studio to edit, build, and debug the project.
So my task was to find a way to build those .sln files from the command line.
Using devenv #
The most obvious way I found was to use a tool called devenv. In fact, that’s
the probably the answer you’ll find if you look up “Building Visual Studio
projects from the command line” on an internet search engine. You’ll also find
places where they suggest you use MSBuild.exe.
But, bad luck, if you try to run devenv directly from cmd.exe, you’ll get the
famous error message:
'devenv' is not recognized as an internal or external command, operable program or batch file.
The trick is to use one of the “Command Prompt” you’ll find in the start menu:
I started with the “Developer Command Prompt”:
cd c:\User\dmerej\src\cmake\build-vs
devenv CMake.sln
Visual Studio opened. Hum, that’s not what I wanted. Turns out, if you make any mistake in the command line prompt, Visual Studio will open.
The correct way is to add the /build switch:
devenv /build Debug CMake.sln
The output is quite nice:
3>  cmbzip2.vcxproj -> C:\...\src\cmake-3.7.2\build-vs\Utilities\cmbzip2\Debug\cmbzip2.lib
7>------ Build started: Project: cmjsoncpp, Configuration: Debug Win32 ------
7>  Building Custom Rule C:/Users/dmerej/src/cmake-3.7.2/Utilities/cmjsoncpp/CMakeLists.txt
7>  CMake does not need to re-run because
      C:\...\src\cmake-3.7.2\build-vs\Utilities\cmjsoncpp\CMakeFiles\generate.stamp
      is up-to-date.
2>  Generating Code...
6>  fs-poll.c
2>  Compiling...
Using MSBuild #
You can also try using MSBuild.exe, but the output is a bit uglier.
(But you get more info, such as the time it took to compile a project, the full
command line used, and the number of warnings/errors):
Project
  "c:\Users\dmerej\src\cmake-3.7.2\build-vs\Utilities\cmcompress\cmcompress.vcxproj.metaproj" (7)
  is building
  "c:\Users\dmerej\src\cmake-3.7.2\build-vs\Utilities\cmcompress\cmcompress.vcxproj" (8)
  on node 1 (default targets).
InitializeBuildStatus:
  Creating
  "cmcompress.dir\Debug\cmcompress.tlog\unsuccessfulbuild"
  because "AlwaysCreate" was specified.
CustomBuild:
  Building Custom Rule C:/Users/dmerej/src/cmake-3.7.2/Utilities/cmcompress/CMakeLists.txt
  CMake does not need to re-run because
    C:\Users\dmerej\src\cmake-3.7.2\build-vs\Utilities\cmcompress\CMakeFiles\generate.stamp
    is up-to-date.
ClCompile:
  C:\Program Files (x86)\Microsoft Visual Studio 14.0\VC\bin\CL.exe /c
  /I"C:\Users\dmerej\src\cmake-3.7.2\build-vs\Utilities"
  /I"C:\Users\dmerej\src\cmake-3.7.2\Utilities" /Zi /nologo /W3 /WX- /Od /Ob0
  /Oy- /D WIN32 /D _WINDOWS /D _DEBUG /D _CRT_SECURE_NO_DEPRECATE /D
  _CRT_NONSTDC_NO_DEPRECATE /D CURL_STATICLIB /D "CMAKE_INTDIR=\"Debug\"" /D
  _MBCS /Gm- /RTC1 /MDd /GS /fp:precise /Zc:wchar_t /Zc:forScope /Zc:inline
  /Fo"cmcompress.dir\Debug\\" /Fd"cmcompress.dir\Debug \cmcompress.pdb" /Gd /TC
  /analyze- /errorReport:queue
  "C:\Users\dmerej\src\cmake-3.7.2\Utilities\cmcompress\cmcompress.c"
cmcompress.c
...
cmArchiveWrite.cxx
cmBase32.cxx
cmBootstrapCommands1.cxx
...

0 Warning(s)
0 Error(s)

Time Elapsed 00:00:06.93
Using CMake to build #
OK, so now I knew how to build Visual Studio projects from command line.
We had a pretty big C++ code base, that we wanted to build on Linux, macOS and Windows.
We were using Jenkins to do continuous integration, so we had to write build scripts that would run on the nodes as soon as any developer would make a merge request to make sure the proposed changes will build on all platforms.
On Linux and macOS, the default generator is “Unix Makefiles”, so the code was straightforward:
#/bin/bash -e

git pull
mkdir -p build
(
  cd build
  cmake ..
  make
)
On Windows, we used Batch files:
git pull
@call "%VS140COMNTOOLS%VsDevCmd.bat"
mkdir build
cd build
cmake ..
devenv foo.sln /build
You may wonder where the weird @call "%VS140COMNTOOLS%VsDevCmd.bat" line comes from.
First, if you go to C:\ProgramData\Microsoft\Windows\Start Menu\Programs\Visual Studio 2015\Visual Studio Tools, you can right-click on the “Developer Command
Prompt” shortcut and open the “Properties” window. There you’ll find that the
target is:
cmd.exe /k "C:\Program Files (x86)\Microsoft Visual Studio 14.0\Common7\Tools\VsDevCmd.bat"
Second, if you are lucky, someone1 will tell you that with any version of Visual
Studio, an environment variable called VS<version>COMNTOOLS is set, where
<version> is the 2 or 3 digits version number of your Visual Studio install.
Here is a table if you don’t know what I mean:
"Marketing" version      "Internal" version
Visual Studio 8 2005         80
Visual Studio 9 2008         90
Visual Studio 10 2010       100
Visual Studio 11 2012       120
Visual Studio 12 2013       130
Visual Studio 14 2015       140
Thus, you can avoid hard-coding the Visual Studio installation path, and use the
VS140COMNTOOLS variable instead. (You still need to hard-code Visual Studio
version, though).
So what the command does is concatenate the value of the VS140COMNTOOLS
environment variable with the basename of the prompt file (VsDevCmd.bat), and run
@call on it.
Using Python #
But, as time went by, we wanted to rewrite all the build scripts in Python,
so that we could factorize some of the code.
(For instance, running git pull to update the sources before building)
On Linux and macOS it was easy:
subprocess.check_call(["cmake", ".."], cwd=build_dir)
subprocess.check_call(["make"], cwd=build_dir)
But on Windows, things were a bit trickier. How were we going to implement
the @call \path\to\bat_file in Python?
setuptools to the rescue! #
I discovered that setuptools – the module used by Python to run the setup.py
files – was able to build things with Visual Studio, without having to use the
Visual Studio command prompts.
So I looked at the implementation, and found a solution:
def source_bat(bat_file):
  interesting = {"INCLUDE", "LIB", "LIBPATH", "PATH"}
  result = {}

  process = subprocess.Popen('"%s"& set' % (bat_file),
                        stdout=subprocess.PIPE,
                        shell=True)
  (out, err) = process.communicate()

  for line in out.split("\n"):
      if '=' not in line:
          continue
      line = line.strip()
      key, value = line.split('=', 1)
          result[key] = value
    return result
The idea is to run a batch script (that’s why we are using shell=True) that will:
- Call the
.batfile we need - Run the built-in
setcommand and parse its output - Returns the whole environment in a Python dict.
Indeed, there are several ways to use set on cmd.exe:
- To set an environment variable:
set FOO=BAR - To unset an environment variable:
set FOO= - To see all the environment variable whose name start with prefix:
set <prefix> - To dump all the environment variables:
set
We parse the output of set to find the three variables we need (they are
all lists of semi-colon separated paths)
PATH: to find the required executables (thedevenvcommand)LIB: where the compiler will look for.libfilesINCLUDE: where the compiler will look for headers files.
By the way, if you are wondering why the function is called source_bat, it’s
because on Unix, to execute a bash script and have your environment updated, you
need to use the source built-in, or, on some other shells, the . command,
(but I digress).
Building the .sln file #
There was an other problem, though. On Linux and macOS, the command to build is
always make.
But on Windows, I had to carefully craft the devenv command, and this meant
specifying the path to the .sln file.
At first, I only had a few bad solutions:
- Hard-code the name of the
.slnfile - Parse the top
CMakeListsto find theproject()call2 - List the contents of the build directory, and hope they’ll will be only one
file with the
.slnextension.
Luckily, by running cmake --help I discovered there was --build switch I
could use to abstract the command line to run for the project to be built.
So the code looked like:
def configure_and_build():
    if os.name == "nt":
        generator = "Visual Studio 14 2015"
    else:
        generator = "Unix Makefiles"

    subprocess.check_call(["cmake", "-G", generator, ".."], cwd=build_dir)
    subprocess.check_call(["cmake", "--build", ".", cwd=build_dir)
This meant I could run cmake --build anywhere, without having to deal with
those nasty .bat files.
Using multiple CPUs at once #
By default, Visual Studio projects get built using all the CPU resources, but
it’s not the case for the make command.
So the code had to be patched again to have make use all available CPUS:
import multiprocessing

def build():
    cpu_count = multiprocessing.cpu_count()
    cmd = ["cmake", "--build", "."]
    if os.name != "nt":
      cmd.extend(["--", "-j", str(cpu_count)])
    subprocess.check_call(cmd, cwd=build_dir, env=build_env)
(The -- argument is here to separate arguments parsed by cmake binary from
the one sent to the underlying build command. It’s a common practice for command-line tools)
Performance issues #
So we had our Jenkins nodes running Python scripts to build the same source code on Linux, macOS, and Windows, and everything was fine, except that the builds would take much longer on Windows.
At first I thought, “Well,it’s a known fact that running executables and accessing the file system will always be slower on Windows, and there’s nothing we can do about it”.
But members of my team kept complaining about the long build times, and I was not feeling good about it: as someone said once, “When doing continuous integration, computers should be waiting for humans, and not the other way around”.
So, I looked for solutions to improve performance.
Using NMake #
If you look at the size of the files generated by CMake when using Visual Studio, you realize it will not be easy to have good performance.
For instance, to build CMake you have a .sln file with 842 lines, which
references 115 .vcxproj files.
Looking at the contents of the files, it’s no wonder parsing them takes quite some time.
// In CMake.sln
Microsoft Visual Studio Solution File, Format Version 12.00
# Visual Studio 14
Project("{2150E333-8FDC-42A3-9474-1A3956D46DE8}") = "CMakePredefinedTargets", "CMakePredefinedTargets", "{0FD1CAE9-153C-32D5-915F-6AB243496DE3}"
EndProject
Project("{2150E333-8FDC-42A3-9474-1A3956D46DE8}") = "CTestDashboardTargets", "CTestDashboardTargets", "{991076F0-B37F-32E8-88B9-1156BDA0D346}"
EndProject
Project("{2150E333-8FDC-42A3-9474-1A3956D46DE8}") = "Tests", "Tests", "{81200686-E54D-3D48-BDD9-782FCB64B8A8}"
EndProject
...
Project("{8BC9CEB8-8B4A-11D0-8D11-00A0C91BC942}") = "ALL_BUILD", "ALL_BUILD.vcxproj", "{BE9010A6-FD75-30CB-B4F7-EC8DD41D6F48}"
	ProjectSection(ProjectDependencies) = postProject
		{FF7E34C4-7170-3648-BBB6-B82173FFD31E} = {FF7E34C4-7170-3648-BBB6-B82173FFD31E}
		{765BC85F-D03F-35FC-ADE0-26ED16D75F4D} = {765BC85F-D03F-35FC-ADE0-26ED16D75F4D}
        ...
<!-- in Source\cmake.vcxproj -->
<?xml version="1.0" encoding="UTF-8"?>
<Project DefaultTargets="Build" ToolsVersion="14.0" xmlns="http://schemas.microsoft.com/developer/msbuild/2003">
  <ItemGroup Label="ProjectConfigurations">
    <ProjectConfiguration Include="Debug|Win32">
      <Configuration>Debug</Configuration>

      ...

    <ClCompile>
      <AdditionalIncludeDirectories>C:\Users\dmerej\src\cmake-3.7.2\build-vs\Utilities;C:\Users\dmerej\src\cmake-3.7.2\Utilities;C:\Users\dmerej\src\cmake-3.7.2\build-vs\Source;C:\Users\dmerej\src\cmake-3.7.2\Source;C:\Users\dmerej\src\cmake-3.7.2\build-vs\Utilities\cmcompress;C:\Users\dmerej\src\cmake-3.7.2\Source\CTest;%(AdditionalIncludeDirectories)</AdditionalIncludeDirectories>
      <AssemblerListingLocation>Debug/</AssemblerListingLocation>
      <BasicRuntimeChecks>EnableFastChecks</BasicRuntimeChecks>
      <CompileAs>CompileAsCpp</CompileAs>
      <DebugInformationFormat>ProgramDatabase</DebugInformationFormat>
      <ExceptionHandling>Sync</ExceptionHandling>
      ...
      <PreprocessorDefinitions>WIN32;_WINDOWS;_DEBUG;_CRT_SECURE_NO_DEPRECATE;_CRT_NONSTDC_NO_DEPRECATE;CURL_STATICLIB;LIBARCHIVE_STATIC;UNICODE;_UNICODE;WIN32_LEAN_AND_MEAN;CMAKE_BUILD_WITH_CMAKE;CMAKE_INTDIR="Debug";%(PreprocessorDefinitions)</PreprocessorDefinitions>
      <ObjectFileName>$(IntDir)</ObjectFileName>
    </ClCompile>

    ...
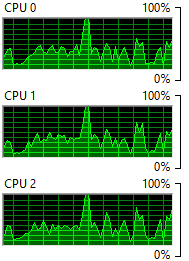
Also, if you look at CPU usage during build, you can see you are far from using all the CPU power:
So I tried to find a CMake generator that would generate simpler code.
During my research, I found out that Microsoft had their own implementation of
the Make program called NMake, so I decided to use the NMake Makefile
generator.
This time I’ll be using cl.exe, link.exe and their friends directly.
I tried using the MSBuild command prompt, but I got:
cmake -G"NMake Makefiles" ..

-- The C compiler identification is unknown
-- The CXX compiler identification is unknown
CMake Error at CMakeLists.txt:11 (project):
  No CMAKE_C_COMPILER could be found.

  Tell CMake where to find the compiler by setting either the environment
  variable "CC" or the CMake cache entry CMAKE_C_COMPILER to the full path to
  the compiler, or to the compiler name if it is in the PATH.


CMake Error at CMakeLists.txt:11 (project):
  No CMAKE_CXX_COMPILER could be found.

  Tell CMake where to find the compiler by setting either the environment
  variable "CXX" or the CMake cache entry CMAKE_CXX_COMPILER to the full path
  to the compiler, or to the compiler name if it is in the PATH.


-- Configuring incomplete, errors occurred!
See also "C:/Users/dmerej/src/cmake-3.7.2/build-msbuild-nmake/CMakeFiles/CMakeOutput.log".
See also "C:/Users/dmerej/src/cmake-3.7.2/build-msbuild-nmake/CMakeFiles/CMakeError.log".
Here, CMake cannot find cl.exe because it’s not in the %PATH%.
And indeed, if you try to run cl.exe from the MSBuild Command Prompt, you’ll get
the same “cl.exe is not recognized …” error.
So I tried using the ‘Developer Command Prompt" I already used before back when
I was runnig devenv by hand:
mkdir build-nmake
cd build-nmake
cmake -G"NMake Makefiles" ..

-- The C compiler identification is MSVC 19.0.24210.0
-- The CXX compiler identification is MSVC 19.0.24210.0
-- Check for working C compiler: C:/Program Files (x86)/Microsoft Visual Studio 14.0/VC/bin/cl.exe
-- Check for working C compiler: C:/Program Files (x86)/Microsoft Visual Studio 14.0/VC/bin/cl.exe -- works
-- Detecting C compiler ABI info
-- Detecting C compiler ABI info - done
-- Check for working CXX compiler: C:/Program Files (x86)/Microsoft Visual Studio 14.0/VC/bin/cl.exe
-- Check for working CXX compiler: C:/Program Files (x86)/Microsoft Visual Studio 14.0/VC/bin/cl.exe -- works
Huzzah, the compiler is found!
You may notice that the path to cl.exe is just VC\bin\cl.exe. (There are
other folders in VC\bin, but here we are using the default, 32 bits version)
Also, I was pleased to find out that only 30 or so Makefiles files were generated.
So the next step was:
cd build-nmake
nmake
[ 27%] Built target cmsysTestsCxx
[ 27%] Built target cmsysTestDynload
[ 44%] Built target cmlibarchive
[ 61%] Built target cmcurl
[ 62%] Built target LIBCURL
Scanning dependencies of target CMakeLib
[ 62%] Building CXX object Source/CMakeFiles/CMakeLib.dir/cmCommands.cxx.obj
cmCommands.cxx
[ 62%] Linking CXX static library CMakeLib.lib
I was quite happy to see the I got the same nice output (with the percentage of progress) as on Linux and macOS.
But then I discovered that only one CPU was used during compilation.
And running nmake /? gave nothing being able to run multiple jobs in parallel.
Frack!
Using JOM #
Looking at cmake --help output again I discovered there was yet another generator
called “NMake Makefiles JOM”
Jom is a tool made by Qt folks. It’s a
re-implementation of the nmake command, but with support for multiple jobs.
The command line switch to build with multiple CPU is also called -j, which is
nice because it meant the build script code would get simpler.
That gave quite some good results, but the build was still slower than on Linux and macOS.
In order to investigate, I decided to keep the Windows resource monitor opened during a build with JOM:
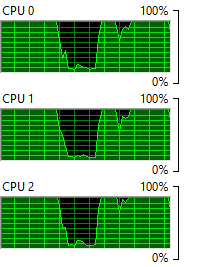
You can see there’s a drop in CPU usage during build. From what I understand, it happens during linking.
Using Ninja #
Finally, circa 2010, Ninja came out.
As soon as I read the description of the project: “a small build system with a focus on speed”, and the fact there was an experimental support for it in CMake, I was dying to try it out.
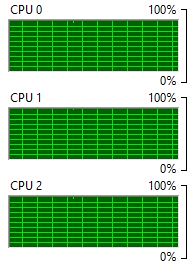
And it fact, it gave great results! For the first time in years, I finally had the same build times on Windows than on Linux, and the CPU usage was a nice steady line around 100% for all cores:
I also got the terse output that gave Ninja its name. 3
cmake -GNinja ..
cmake --build .
[11/11] Linking CXX executable Tests\CMakeLib\CMakeLibTests.exe
A story of cross-compiling #
After several years of using the CMake + Ninja combination, I got an error message during one of our CI builds:
Linker fatal error: LNK1102: out of memory
Googling the error lead to: https://support.microsoft.com/en-us/help/2891057/linker-fatal-error-lnk1102-out-of-memory
So I tried to follow the advice in the “Resolution” section and took a closer look at the list of command line prompts in the start menu:

Below the two prompts on top I already tried, there was a few entries, all of
them shortcuts to the same .bat file, but with different arguments:
VS2015 x64 ARM          "C:\...\Visual Studio 14.0\VC\vcvarsall.bat" amd64_arm
VS2015 x64 Native:      "C:\...\Visual Studio 14.0\VC\vcvarsall.bat" amd64
VS2015 x66 x86 Cross    "C:\...\Visual Studio 14.0\VC\vcvarsall.bat" amd64_x86
Aha! So, all I have to do was to call the vcvarsall.bat file with the correct arguments, which was
confirmed when I took a look at the contents of the .bat file:
...
:check_platform
if /i %1 == x86       goto x86
if /i %1 == amd64     goto amd64
...
goto usage
:x86
...
call "%~dp0bin\vcvars32.bat" %2 %3
goto :SetVisualStudioVersion

:amd64
...
call "%~dp0bin\amd64\vcvars64.bat" %2 %3
goto :SetVisualStudioVersion
So the Python code was patched again:
def source_bat(bat_file, arch):
  interesting = {"INCLUDE", "LIB", "LIBPATH", "PATH"}
  result = {}

  process = subprocess.Popen('"%s %s"& set' % (bat_file, arch),
                        stdout=subprocess.PIPE,
                        shell=True)
  (out, err) = process.communicate()
And CMake output was:
c:\Users\dmerej\src\cmake-3.7.2\build-cross-64-32>cmake -GNinja ..
-- The C compiler identification is MSVC 19.0.24210.0
-- The CXX compiler identification is MSVC 19.0.24210.0
-- Check for working C compiler: C:/Program Files (x86)/Microsoft Visual Studio 14.0/VC/bin/amd64_x86/cl.exe
-- Check for working C compiler: C:/Program Files (x86)/Microsoft Visual Studio 14.0/VC/bin/amd64_x86/cl.exe -- works
-- Detecting C compiler ABI info
-- Detecting C compiler ABI info - done
-- Check for working CXX compiler: C:/Program Files (x86)/Microsoft Visual Studio 14.0/VC/bin/amd64_x86/cl.exe
-- Check for working CXX compiler: C:/Program Files (x86)/Microsoft Visual Studio 14.0/VC/bin/amd64_x86/cl.exe -- works
-- Detecting CXX compiler ABI info
Notice the amd64_x86 subfolder.
Code signing breakage #
Everything was OK for a while, until we decided we wanted to sign the executables before shipping them.
It seemed the most obvious way was to use signtool.exe, so I proceeded to
install the Windows Driver Kit,
as instructed on the Windows Dev Center 4
But then all our builds started failing with:
C:\Program Files (x86)\Microsoft Visual Studio 14.0\VC\INCLUDE\crtdefs.h(10):
fatal error C1083:
Cannot open include file: 'corecrt.h': No such file or directory
I looked for a solution but all I got was people telling me to set INCLUDE and LIB by hand.
Well, I already had Python code computing the environment variables, so the fix was:
def get_build_env(arch):
    vs_comntool_path = os.environ["VS140COMNTOOLS"]
    bat_file = find_bat_file(vs_comntool_path)
    env = source_bat(bat_file, env)

    inc_path = r"C:\Program Files (x86)\Windows Kits\10\Include\10.0.10069.0\ucrt\include"

    if arch == "amd64_x86":
        subfolder = "x86"
    else:
        subfolder = "x64"

    lib_path = r"C:\Program Files (x86)\Windows Kits\10\Lib\10.0.10069.0\ucrt\%s" % subfolder

    env["INCLUDE"] += inc_path + ";"
    env["LIB"] += lib_path + ";"
Note how we have x64 instead of amd64 here :)
Conclusion #
Well, that’s all I’ve got for today.
Building Visual Studio projects with CMake and Ninja works quite well if you
have build scripts in Python, providing you are willing to run .bat scripts,
and carefully apply changes to the environment variables.
Soon I’ll try and see how things go with Visual Studio 2017, maybe things will get easier, who knows?
Until then, may the Build be with you!
Update: I’ve decided to cross-post this article on dev.to. Let’s see how it goes!
-
David, if you read this, thank you so much! ↩︎
-
More info in the CMake documentation ↩︎
-
It’s just one line of output that disappears quickly after the build is done, do you get it? ↩︎
-
Turned out I somehow missed this page telling me
signtool.exewas already installed when I set up Visual Studio on the node … ↩︎
Thanks for reading this far :)
I'd love to hear what you have to say, so please feel free to leave a comment below, or read the contact page for more ways to get in touch with me.
Note that to get notified when new articles are published, you can either:
- Subscribe to the RSS feed
- Follow me on Mastodon
- Follow me on dev.to (mosts of my posts are mirrored there)
- Or send me an email to subscribe to my newsletter
Cheers!