Let's have a pint of (vim) ale!
TL;DR: vim-ale is awesome and you should give a try!
Introduction: the rise of linters #
I’ve already blogged about linters and how I use them when I write Python code.
Let’s recap:
- I have a shell script call
lint.shwhich calls several linters. One for the style only, and several for static analysis.
#!/bin/bash -xe

pycodestyle .
python bin/run-pyflakes.py
python bin/run-mccabe.py 10
pylint mymodule
Note that the script runs the fast linters first (pycodestyle and pyflakes
are pretty fast), and ends by running pylint, which can get pretty slow on
big code bases.
- I use:
:set makeprg=./lint.sh - I type:
:makewhen I’m done writing code. - I wait for script to finish (Neovim can’t be used for editing while the makeprg program is running)
- I use the quickfix window to fix lint errors.
This works quite well for me when I’m using Python because:
- I know the code style pretty well so I rarely have style errors
- For me running
pylintis as slow as running tests, and I’m used to have tests running synchronously too. - I like using the
quickfixwindow (thanks to the very nice vim-qf plug-in by the way)
But some time ago at work, we all start working on some JavaScript code.
We use eslint for code style, flow for type checking, and mocha plus chai for tests.
And since we’re using GitLab for hosting our source
code, we of course have a .gitlab-ci.yml file to run all of these for each
merge request.
Shortcomings of the makeprg approach #
At first I tried using the same work flow as with Python, but I quickly face some issues.
Finding the binaries to run #
Knowing which binary to use for the linting program can be hard. Sometimes you
can use the one that is in your $PATH, but sometimes you want the binary
that is in node_modules/.bin
Learning the style convention #
Our eslint configuration is quite strict. (It’s based on the one from
Air B&B if you’re curious),
and I’m not used to JavaScript yet, so I constantly had style issues and it was
frustrating to have my merge requests blocked because I forgot to run
:make and had a bunch of style problems.
The errorformat #
For Neovim to populate the quickfix window, it has to parse the output of the linters programs.
By default, eslint output looks like this
$ eslint foo.js
/path/to/foo.js
  1:5   error  'foo' is assigned a value but never used          no-unused-vars
  3:10  error  'bar' is defined but never used                   no-unused-vars
  5:1   error  Expected indentation of 1 tab but found 2 spaces  indent

✖ 3 problems (3 errors, 0 warnings)
  2 errors, 0 warnings potentially fixable with the `--fix` option.
It’s very pretty (and I did not even show you the nice colors!), but you can see it’s a bit hard to parse for other programs. 1
The solution is to use the --format option like this:
$ eslint --format compact foo.js
/path/to/foo.js: line 1, col 5, Error - 'foo' is assigned a value but never used. (no-unused-vars)
/path/to/foo.js: line 3, col 10, Error - 'bar' is defined but never used. (no-unused-vars)
/path/to/foo.js: line 5, col 1, Error - Expected indentation of 1 tab but found 2 spaces. (indent)

3 problems
But by default Neovim expects an output exactly like gcc2
$ gcc foo.c
foo.c:3:3: error: ‘a’ undeclared (first use in this function)
foo.c:4:3: warning: implicit declaration of function ‘foo’ [-Wimplicit-function-declaration]
(No ’line’ and ‘col’ , and no commas)
So in order for the line numbers and columns to be parsed correctly you have to
use a variable called errorformat
let errorformat =
        \ '%f:%l:%c: %trror: %m,' .
        \ '%f:%l:%c: %tarning: %m,' .
        \ '%f:%l:%c: %tote: %m'
It’s pretty hard to get right, even if you read the documentation (chapter 7, the “The Error Format”)
Running synchronously #
Last but not least, all the linters ran quite fast (even flow, because it uses
a background server under the hood).
So it was also painful to have the editor unresponsive for the few seconds it took for all the linters to run.
Switching to vim-ale #
After hearing good things about vim-ale,
I decided to give it a try, and I was very pleased to notice it was able to
run eslint and flow in our JavaScript project with zero configuration!
This is how vim-ale works by default:
- First, get the current
filetype(This is done by Neovim itself 3), in our casejavascript - Then, look for files in the matching ale_linters folder to get a list of potential linters.
- Then, after a small time of inactivity (200ms by default), run all the linters found in the previous step, concurrently and in the background.
- Then, parse the output of all of them and use the sign gutter to display problematic lines, like this:
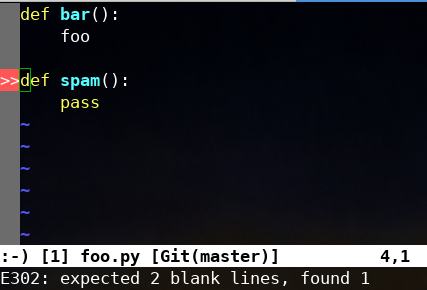
Notice the red angle brackets in the column on the left, and the detailed message on the bottom.
Also, by default the whole gutter will disappear when there’s nothing found by the linters, which allows you to instantly know you’re done fixing lint errors.
Simple customization #
After reading vim-ale documentation, I was able to tweak a few details:
I prefer having the linters run only after I save the file, not continuously, otherwise I find it too distracting:
let g:ale_lint_on_text_changed = 'never'
I also don’t like the linters to run right after I open a file:
let g:ale_lint_on_enter = 0
The location list #
By default, vim-ale uses the so called location list. It looks pretty
much like the quickfix window, but:
- There’s one location list per window, whereas the quickfix is global.
- The location list is destroyed as soon as the window is closed
- You can use the same bindings to navigate the location list, using a
lprefix instead of ac. (For instancelpreviousandlnextinstead ofcpreviousandcnext)
At first I was tempted to configure vim-ale to use the quickfix window instead
(which can be done by setting the g:ale_set_quickfix variable), as I was doing
for Python, but I’ve decided to try and let vim-ale use the location list for
several reasons:
- I’ve heard about the location list for quite some time, but I’d never actually use it, so I was curious and wanted to know if it could fit in my workflow.
- I already used the quickfix window with
:grepand other tools and I did not like having it replaced byvim-aleall the time.
Custom mappings #
I was already used to type :cp, :cn and :cr (:cprevious, :cnext and
:crewind) to navigate the quickfix list, but it turned out it was harder
to use their location list counterparts:
:lncannot be used for:lnextbecause it actually is used as a shortcut for:lnoremap- I use the Dvorak layout on my keyboard,
and typing
ln,lporlris much harder to type thancn,cporcrthere.
Now, Neovim has this concept of “leader” key you can use to prefix all your custom mappings.
I’m using “comma” for this, instead of the default (backslash), that I find hard to type.
So of course I could have used a <leader> mapping for the location list
command, but it unfortunately <leader>p, <leader>n, and <leader>r were already taken.
That’s when I remember someone suggesting using “space” as a leader key, and so I used:
nnoremap <space>l :lnext<CR>
nnoremap <space>p :lprevious<CR>
nnoremap <space>r :lrewind<CR>
Note: this means I can no longer easily use the space bar in normal mode, but by default all the space key does in move the cursor forward, so it’s not a big deal.
Back to Python #
As I describer earlier, vim-ale is pretty smart, and comes pre-configured with
the pylint and pyflake linters.
This means that every time I was saving code in a Python file, vim-ale would
find pylint and flake in the virtualenv or in the PATH, and run them with
the default options.
It’s not what I wanted, but it was easy to turn in off:
let g:ale_linters = {
  \ 'python': [] ,
  \ }
(Configuration of the ale_linters dictionary is a bit weird: it assumes you
want to run all the linters for every filetype, so you have to define some kind of
“blacklist” to turn off the linters you don’t want to run)
But by then I started to miss having the style being checked after each save.
(This is what happens when you start using great tools: you wish you can use them all the time 4)
Unfortunately, vim-ale did not know about pycodestyle so I had to patch the
code of the plug-in.
Adding a vim-ale linter #
In our case the pycodestyle output looks like this:
$ pycodestyle foo.py
foo.py:4:1: E302 expected 2 blank lines, found 1
There’s the filename, the line, the column, a short code (E302 in the
example), and a detailed message (expected 2 blank lines, found 1)
So I started adding a new file in code in ale_linters/python/pycodestyle.vim
Here are the relevant parts:
" By default, use `pycodestyle` from path, unless it is set
" in the `g;ale_python_pycodestyle_executable` variable:
let g:ale_python_pycodestyle_executable =
\   get(g:, 'ale_python_pycodestyle_executable', 'pycodestyle')

" Look for pycodestyle in the virtualenv, and only if not found
" in it, default to the previously set pycodestyle executable:
function! ale_linters#python#pycodestyle#GetExecutable(buffer) abort
  ...
  if !ale#Var(a:buffer, 'python_pycodestyle_use_global')
    let l:virtualenv = ale#python#FindVirtualenv(a:buffer)

    if !empty(l:virtualenv)
      let l:ve_pycodestyle = l:virtualenv . '/bin/pycodestyle'

      if executable(l:ve_pycodestyle)
        return l:ve_pycodestyle
      endif
    endif

  endif

  return ale#Var(a:buffer, 'python_pycodestyle_executable')

endfunction

" Get the full command line to run: append contents from the
" python_pycodestyle_options variable if it exists:
function! ale_linters#python#pycodestyle#GetCommand(buffer) abort
    return fnameescape(ale_linters#python#pycodestyle#GetExecutable(a:buffer))
    \   . ' ' . ale#Var(a:buffer, 'python_pycodestyle_options')
    \   . ' %s'
endfunction

" Register pycodestyle as a linter for the `python` filetype:
call ale#linter#Define('python', {
\   'name': 'pycodestyle',
\   'executable_callback': 'ale_linters#python#pycodestyle#GetExecutable',
\   'command_callback': 'ale_linters#python#pycodestyle#GetCommand',
\   'callback': 'ale#handlers#python#HandlePyCodeStyle',
...
\})
You’ll notice everything is done with callbacks to get the path to the executable, the full command line, and how to parse the output.
And here’s the implementation of the pycodestyle output parser.
function! ale#handlers#python#HandlePyCodeStyle(buffer, lines) abort
    " Regular expression to match messages:
    " They look like:
    " <file>:<line>:<col>: <code> <detailed text>
    let l:pattern = '\v^[a-zA-Z]?:?[^:]+:(\d+):?(\d+)?: \[?([[:alnum:]]+)\]? (.*)$'

    " For each match, update the l:output list:
    let l:output = []
    for l:match in ale#util#GetMatches(a:lines, l:pattern)
        let l:code = l:match[3]

        call add(l:output, {
        \   'lnum': l:match[1] + 0,
        \   'col': l:match[2] + 0,
        \   'text': l:code . ': ' . l:match[4],
        \})
    endfor

    return l:output
endfunction
You’ll note it’s done by writing “real” code (it’s still vimscript, though)
with helpers functions, instead of trying to set a weird errorformat option,
with hard to read syntax.
And that’s all there is to it. All I had to do was to set the ale_linters
dictionary to only run pycodestyle:
let g:ale_linters = {
  \ 'python': ['pycodestyle'] ,
  \ }
and then I could keep using :make and the quickfix window for the slower
linters like pylint like I used to :)
Conclusion #
vim-ale requires very little configuration to work out of the box. The
asynchronous features are really nice (and they work both in Neovim and Vim 8).
It has tons of customization options, and last but not least, new linters are
easy to add and customize.
I highly recommend you give it a try.
Cheers!
-
There’s a whole rant to be written about the console output of JavaScript tools, but let’s save that for another day … ↩︎
-
There’s a bunch of code in Vim that assumes you are writing C code, even today (historical reasons, as they say) ↩︎
-
It’s done in 2793 lines of vim script ↩︎
-
Regular readers of this blog will notice this is exactly what happened to me with
fzf↩︎
Thanks for reading this far :)
I'd love to hear what you have to say, so please feel free to leave a comment below, or read the contact page for more ways to get in touch with me.
Note that to get notified when new articles are published, you can either:
- Subscribe to the RSS feed
- Follow me on Mastodon
- Follow me on dev.to (mosts of my posts are mirrored there)
- Or send me an email to subscribe to my newsletter
Cheers!